 |
| Elizabeth Taylor, 1932-2011 |
Rest peacefully, Lady Elizabeth.
And now, on to some of my as-yet-to-be-blogged-about knitting finished objects. I'll start with the Joukahainen sweater I made for Mr. Masala.

It is knit in Knit Picks Wool of the Andes, a worsted-weight 100% Peruvian Highland wool. I knit up a size L, which fit him perfectly, although he told me he would have liked another inch or two of ribbing along the bottom. The large size required twelve skeins, roughly 1320 yards of the yarn. The pattern is based upon the sweater recipe from a couple Elizabeth Zimmerman books, utilizing her percentage system (EPS). It is knit bottom-up and in-the-round, so there is no seaming. This was my first pullover, and while the pattern is suitable for a first-time sweater knitter, I had issues with the raglan decreases. They involved cables, a rather simple cable at that. Which was fine until stitches in or near the cables dropped. Why I kept dropping stitches, I don't know. But it seemed like I'd only notice them after I was several knitting rounds away. Sigh. Fixing those drops was a headache, which in turn took away from the integrity of the cables, visibly. But, it's my first pullover and he wears it proudly. A better-knitted version is in the future, to be sure.
About the yarn: I really enjoyed knitting with Wool of the Andes. It has established itself as my go-to wool, as it's simply wonderful to work with. I am currently working on another knitting project in WOTA, the Indigo Playmate cardigan by Wendy Bernard from her book Custom Knits. I really love how the yarn cooperates with the movement of the needles. It's not terribly scratchy, is springy and lively, and at merely two bucks per 110-yard-skein, WOTA is very easy on the wallet. It makes an excellent option for those on a budget and/or wanting to break their acrylic yarn habit.
This yarn is 100% wool, so it will felt if washed in the machine or agitated by handwashing in warm or hot water. It also pills easily. I found myself pulling large pilled slubs off of the inside arms of the sleeves where they rub against the body. Once I got them off, the sweater looked good as new. I made sure Mr. Masala understood that he is never to launder this sweater. I washed it myself in what one could most definitely call a non-traditional wool wash: Body Shop's Sweet Lemon Shower Gel, which came in a gift set I got for Christmas. Loving the warm, lemony scent, I decided to use the shower gel as wool wash. I ventured that anything that is gentle enough to wash human skin with is okay for washing wool. And I was right. I tested some WOTA scraps in a solution of water and mostly shower gel with fine results.

I simply used the shower gel to clean the sweater pretty much the same as one would using any other type of wool wash. First I poured about a capsful into the sink as it filled up with cool water, more than half-capacity, so the solution was pretty diluted but still had enough bubbles to please me. I gently put the sweater into the solution, pressed it down a few times to get the material fully saturated, then left it to soak for about ten minutes. Then, I lifted the sweater out of the solution and very lightly squeezed--no twisting, no wringing. Then I placed the sweater onto a thick bath towel and rolled it up jelly-roll style, pressing out more liquid. Taking another dry towel, I laid the sweater out on top of it flat. It dried completely overnight. The shower gel left the sweater clean, soft and lightly scented without any residue. It did not interfere with the dyes. I priced the shower gel at around $8.00 US for 8.4 fl. oz., very economical in comparison to the other popular wool washes out there that can cost as much as $10 for just 4.0 fluid ounces. I'll definitely be trying the other scents in the Body Shop shower gel line, but I'm a huge fan of the Sweet Lemon.
We have approached the final week of Malabrigo March, which is filled with contests and several knit-a-longs (KALs) and crochet-a-longs (CALs) sponsored by the Malabrigo Junkies group on Ravelry. I joined and signed up for the Clapotis KAL.

I had come across so many versions of the Clapotis on the internet and heard about it from knitting podcasters so often, I simply thought, "That's nice--again", but never really felt compelled to knit one, and couldn't really understand why more than 17,000 FOs of the pattern existed on Ravelry. What was it, exactly, about this pattern? Curiosity got the better of me, so I downloaded the free Knitty.com Clapotis pattern designed by Kate Gilbert, plus some accompanying Excel charts, kindly made available through the Clapotis group on Ravelry, and went over to The Fiber Fix and bought some "discounted for Malabrigo March" Silky Merino in the Lettuce colorway. First, let me talk about this yarn.
This wasn't my first Malabrigo purchase, but it was my first Silky Merino. This yarn is single-ply DK-weight made of 50% merino and 50% silk, 150 yards per skein. And it costs a lot less than comparable silk-wool blends, so say it with me: affordable luxury. Now that is sexy. The first time I touched it, I immediately swooned. Several minutes of ooh-ing, ahh-ing, cooing and fondling ensued thereafter. Heaven in a skein. Or "sex in a skein", if you prefer. Yeah. It's like that. Do believe the hype. You should have some idea of what knitting with this yarn is like. In a word: Bliss. The sheen. The hand. And the drape, my God, the drape! *goes and splashes face with ice water and calms down*
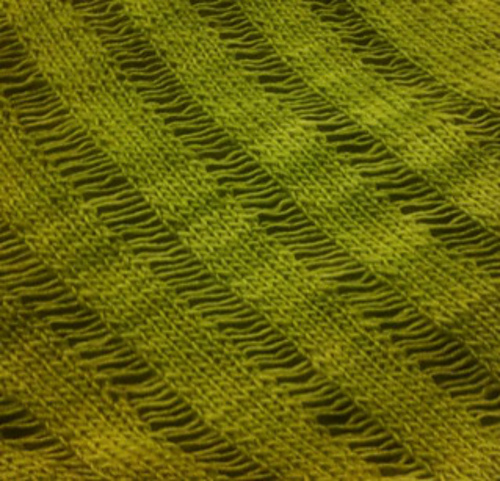
Anyway, here is my current progress on my MM KAL Clapotis. I had to fold it over just a bit to get a decent pic with my not-so-decent phone camera.

Working with this yarn is such a luxurious experience that I switched out my normal plastic stitch markers for these little sea glass beauties from Gloria Patre's Etsy shop:

Next time I knit with Silky Merino, you may find that I've switched out my knitting needles :)
To ensure that I won't run out of yarn before completing my wrap, I am following a concept found in the Ravelry Clapotis group called "The Rule of Fifths", which is a very helpful way in calculating how much yarn you'll need to make your completed Clapotis in the size you want.
The Rule of Fifths basically goes like this: Consider that the pattern has three sections, then divide your total yardage by five. Allow one-fifth for the first and third sections each, then the remaining three-fifths for the second section. In my case, I bought five skeins of Silky Merino at 150 yards per skein, totaling 750 yards. The pattern is broken down as follows: 1) increase section, 2) straight section and 3) decrease section. That means that I will need to use 150 yards, or one skein for Section One, 450 yards, or three skeins for Section Two and the remaining skein, or 150 yards, for Section Three. I am presuming that this will give me a larger Clapotis, at least one that will accommodate my wing span. The number of repeats in Sections One and Three determine length, while those of Section Two determine width. This all becomes evident as the knitting progresses.
Now I'm going to address why I think this pattern is so popular. First, it's quite a lovely garment that can be worn as a scarf, shawl or wrap. Secondly, it's just so much fun to knit! Why? I believe it's has to do with the dropping of the stitches. Earlier, I shared my agony of accidentally dropping stitches while trying to cable the raglan sleeves of the Joukahainen pullover. Imagine how I felt when I came to the purposefully dropped stitches of the Clapotis. Quite honestly, it's the next best thing to popping bubble-wrap.
I reckon I'm about a 3-5 days away from finishing the Clapotis, but I am already planning the next one. Or two. Mother's Day is coming soon, you know.
My next blog entry will feature a sewing update of my Spring Hepburn pants, plus more of my knitting FOs, so do stop by again. Have a great week and, hey--it's finally Spring!

"If you take a flower in your hand and really look at it,
it's your world for the moment."
~Georgia O'Keefe


